Windows Autopilot has been here a long time, even since Windows 10 1703 which was released on April 5, 2017. That time there was only User driven mode for Azure Active Directory join. Since then, many new Windows Autopilot / Intune features have been released. This post covers one of the most amazing new feature, called Self-Deploying mode.
Self-Deploying mode is quite new feature in Windows Autopilot and it’s still in preview phase but it seems to work good enough for this real world scenario. I wanted to harness the Microsoft Surface Go just to do the one job which is to run the single PowerApps application in Kiosk mode straight after computer start up.
This demo is made for Finnish Red Cross Turku branch in part of the Emergency Evacuation Center development program. Program aims to provide real time information about people inside the evacuation center. Visualization part of the system is mostly based on Microsoft PowerApps that are displaying the information from Sharepoint lists.
Prerequisites
- Windows 10 1903 (pre-installed)
- TPM 2.0 + TPM Device Attestation
- Intune Device based licenses
- Store for Business integration with Intune
- MAK license (or some scenario KMS) for Windows 10
- Computer connected to Ethernet during provision (this way provision is zero-touch)
Create Azure AD Dynamic Group
Why dynamic group? It’s because we can then dynamically assign computers to a specific Autopilot deployment profile directly after the Hardware hash of the computer has been imported. Name a dynamic group like “Autopilot Kiosk Dynamic” and add a rule syntax. The OrderID must be the same as you later specify in the Hardware hash – CSV file.
(device.devicePhysicalIds -any _ -eq "[OrderID]:Autopilot Kiosk")
Generate HW Hash
For the testing phase, I manually generate the HW hash. But in a production environment this is not the way you want to do this.. Why? This way you should start all your computers, generate the HW hash, upload it to your tenant and after that reset all computer to OOBE phase and all steps manually. So lot of manual job that just take too much time. A better way is to use examples of OEM Registration or Partner Registration.
Install-Script Get-WindowsAutopilotInfo
Get-WindowsAutopilotInfo.ps1 –OutputFile “C:\Temp\$env:computername.csv”
Open CSV with your favourite editor (notepad is enough), add “Group Tag” header

Add a actual Group Tag name at the end of CSV file. This must be the same as OrderID in the previously created dynamic group.

Import HW Hash to Intune
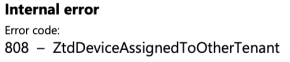
In Microsoft Intune > Device Enrollment – Windows Enrollment > Windows Autopilot devices click “import” to get the CSV file. The process can take up to 15 minutes (normally completed in 2 minutes).. this will take some time as it will validate the HW hash and all tenants will also be checked that the HW Hash is not imported to other tenants. If the hash is found by another tenant, you will see the following error in notifications area:
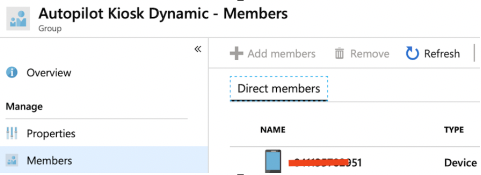
After successfully upload process you will see the device details in Windows Autopilot devices list and notification like successfully uploaded appears.
The device should soon be part of Autopilot Kiosk Dynamic group. Notice! This work is done by the backend so dynamic groups cannot be re-synchronized manually.. Here is the user voice: https://feedback.azure.com/forums/169401-azure-active-directory/suggestions/33481477-ability-to-trigger-a-dynamic-group-update
Windows Autopilot Deployment profile
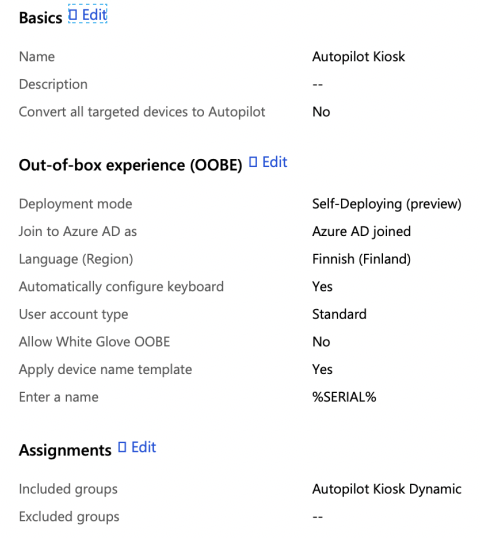
Now is the time to create a deployment profile. With Self-Deploing mode we can configure the region and keyboard configurations automatically which is nice! I really hope that this feature will be soon part of the Autopilot User-driven modes.
We can also define the device name templates. There are a couple of options to define, but I just like computer name to be the same as the serial number so I will use %SERIAL% variable.
Deploy profile to the previously created Autopilot Kiosk Dynamic group
Keep in mind until profile status is “Assigned”, you cannot test provisioning of the device. There is again backend which take care of this so now it’s time to do end of the configurations.

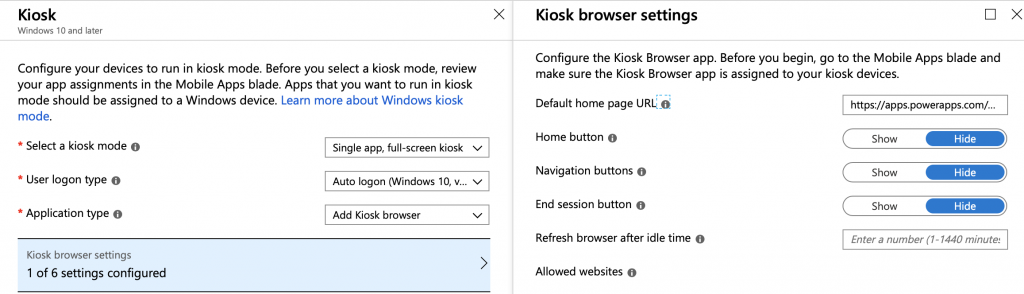
Kiosk configuration
Kiosk profile
Here are the settings to configure kiosk mode, logon type and specific application. First, I tried to run the PowerApps store app itself but this way I always have to launch the required PowerApps application manually which is not the way how I want to run it.
Then I realized that why I could not use Kiosk Browser and the uniq URL of the required application. Let’s try! You can find uniq URL of the application when you go to https://powerapps.microsoft.com / Apps / choose required app / Details
Here is one tip if you want to hide navigation bar of the PowerApps application then simple add &hidenavbar=true to end of the URL.

Disable Display, StandBy and Hibernate timeout settings
I don’t want any timeout settings for this type of the Kiosk device. All timeout settings can be disabled by custom OMA-URI settings:
Name: DisplayOffTimeoutOnBattery
OMA-URI: ./Device/Vendor/MSFT/Policy/Config/Power/DisplayOffTimeoutOnBattery
Data type: String
Value: <enabled/><data id="EnterVideoDCPowerDownTimeOut" value="0"/>

Name: DisplayOffTimeoutPluggedIn
OMA-URI: ./Device/Vendor/MSFT/Policy/Config/Power/DisplayOffTimeoutPluggedIn
Data type: String
Value: <enabled/><data id="EnterVideoACPowerDownTimeOut" value="0"/>

Name: StandbyTimeoutOnBattery
OMA-URI: ./Device/Vendor/MSFT/Policy/Config/Power/StandbyTimeoutOnBattery
Data type: String
Value: <enabled/><data id="EnterDCStandbyTimeOut" value="0"/>

Name: StandbyTimeoutPluggedIn
OMA-URI: ./Device/Vendor/MSFT/Policy/Config/Power/StandbyTimeoutPluggedIn
Data type: String
Value: <enabled/><data id="EnterACStandbyTimeOut" value="0"/>

Name: HibernateTimeoutPluggedIn
OMA-URI: ./Device/Vendor/MSFT/Policy/Config/Power/HibernateTimeoutPluggedIn
Data type: String
Value: <enabled/><data id="EnterACHibernateTimeOut" value="0"/>

Name: HibernateTimeoutOnBattery
OMA-URI: ./Device/Vendor/MSFT/Policy/Config/Power/HibernateTimeoutOnBattery
Data type: String
Value: <enabled/><data id="EnterDCHibernateTimeOut" value="0"/>
Windows activation
Windows 10 subscription activation cannot be used with Kiosk devices because no real user is logged on. You must use MAK key (or KMS In theory if computer is on a corporate network with a KMS server and licenses to activate this). You can use a simple Powershell script for activation, but remember that way MAK key is clear text in the log files. It is up to your privacy policy to decide if this an acceptable way to do this
$WIN10Version = (Get-WmiObject -class Win32_OperatingSystem).Caption

switch -Regex ($WIN10Version) {
'Windows 10 Enterprise' {$MAKkey = 'XXXXX-XXXXX-XXXXX-XXXXX-XXXXX';break}
'Windows 10 Professional' {$MAKkey = 'XXXXX-XXXXX-XXXXX-XXXXX-XXXXX';break}
}

$SoftwareLicensingService = Get-WMIObject -query "select * from SoftwareLicensingService"
$null = $SoftwareLicensingService.InstallProductKey($MAKkey)
$null = $SoftwareLicensingService.RefreshLicenseStatus()
Kiosk Browser (Offline)
Go to https://businessstore.microsoft.com/ and get Offline version of Kiosk Browser. If you can’t see Offline / Online check box then go to settings and tap Show offline apps = On.
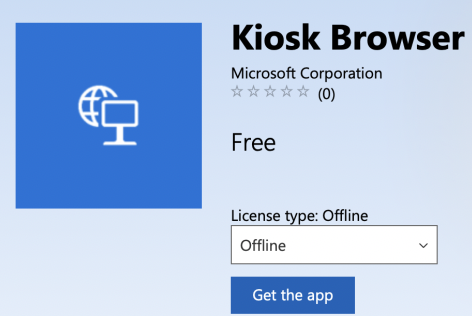
Deploy Kiosk Browser (Offline) to the previously created Autopilot Kiosk Dynamic group.
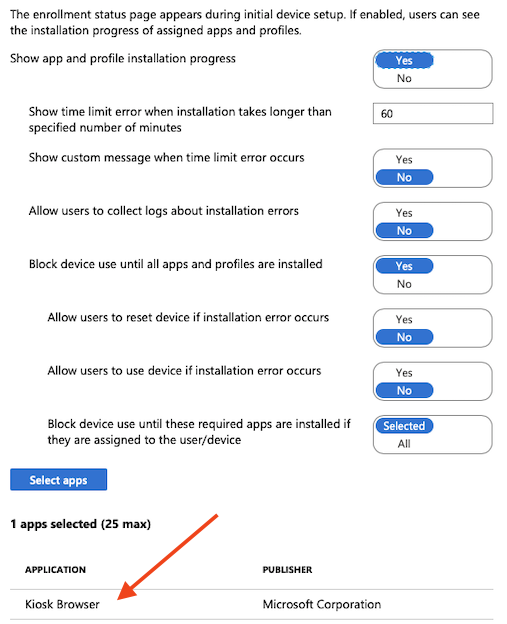
Enrollment Status Page (ESP)
One feature that is not very well documented is that with Self-Deploying mode you need to add ESP settings to the Default profile. This is because currently Intune targets ESP settings only to users, devices groups not working. Because Kiosk computers does not have a real user it then use default set of ESP policies. This one could be the problem if you have other Autopilot deployment profile in use and you don’t want to use ESP.
In this case we wan’t to use block device use until Kiosk Browser is installed. If this is not done, Kiosk computer will start up before the Kiosk Browser is properly installed and user experience is poor..
Testing!
Now all configurations are done! This took no more than couple of hours. I connected Microsoft Surface Go with pre-installed Windows 10 1903 to ethernet cable (works as well with Wi-Fi but then OOBE screens will be appeared) and start the computer up. After 5:58 minutes provisioning was done, Kiosk account automatically logged in and the PowerApps application up and running! Super fast and so cool I would say!
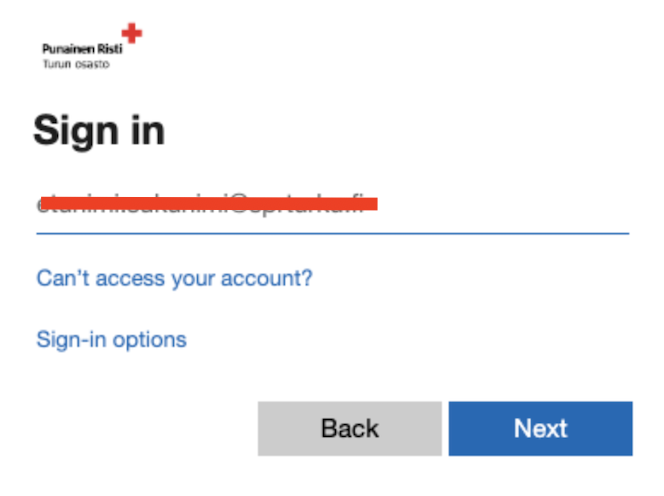
During app first start I have to sign-in with normal account UPN. This is because autologon is made by local Kiosk account.
Yes I want to stay signed in now

Watch the video on the user experience. See how fast it starting up and needed application is up and running!
0 Comments