Yesterday I got my first touches to Windows Virtual Desktop (WVD). There were some issues in the documentation while I was deploying the environment. I will summary my way to deploy WVD in this post.
Concept of Windows Virtual Desktop
First of all. Read the document about terminology and understand it. Then continue… It’s the step number one (1)!! If you want to try yourself WVD, read pre-requirements and check that you fulfill those.
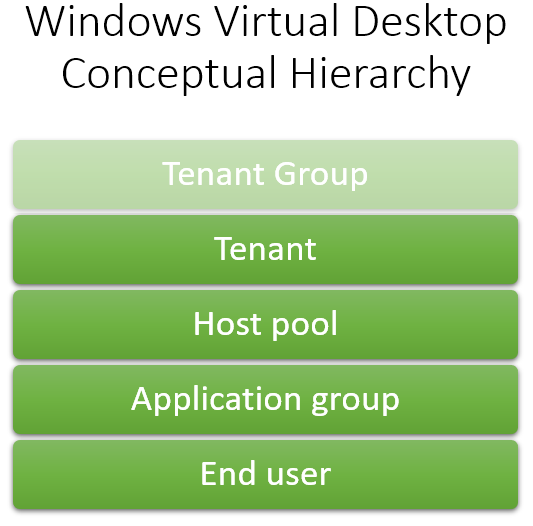
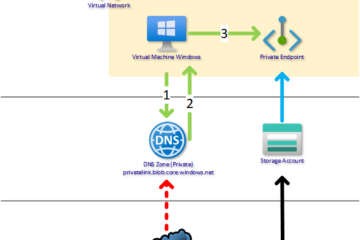
After you understand terminology, you are able to understand the next clarifying picture about the WVD conceptual hierarchy. Tenant Group is always there, but you don’t necessary use it. It is meant for multi-tenancy or top level management purposes.
Deployment phases
Deploying the WVD is not perhaps made too simple. Ensure that you have an Active Directory (on-premises) running and you have synced the directory to Azure AD with AAD Connect and before you think the answer is no, you can’t use here Azure AD Directory Services (at least 27.3.2019).
10.4.2019 – Correction: It’s doable now with AAD DS. I haven’t test it yet, but It’s now doable!
0 – Define some variables
To help the deployment, define some variables for your RDS tenant. Change these for the values that you want.
#Variables
$myTenantGroupName = "Default Tenant Group"
$myTenantName = "Bloggerz"
$myDirectoryID = "aaaaaaaa-bbbb-cccc-dddd-eeeeeeeeeeee"
$mySubscriptionID = "aaaaaaaa-bbbb-cccc-dddd-eeeeeeeeeeee"
1 – Give a consent towards your directory
Go to Windows Virtual Desktop Consent Page to give consents for the service.
Select first the Server App and write your tenant domain or directory ID to the field and select submit. If the next page asks credentials, provide global administrator credentials and approve the consent. Wait 30 seconds and go back to consent page.
After the 30 second selectClient App and give again your tenant domain or directory ID to the field and select submit. Approve also consent for client application.
Go next to your AAD management and select Enterprise applications and Windows Virtual Desktop. From the menu select Users and Groups. Select Add user from the ribbon and select an user who is creating the tenant for your directory. Give TenantCreator -named role for the account.

2 – Create service principal
Create a Service Principal to your environment and take the secret and application ID for later usage (in this example those are in variables).
#Run these under AzureAD module during an active connection
$aadContext = Connect-AzureAD
$svcPrincipal = New-AzureADApplication -AvailableToOtherTenants $true -DisplayName "Windows Virtual Desktop Svc Principal"
$svcPrincipalCreds = New-AzureADApplicationPasswordCredential -ObjectId $svcPrincipal.ObjectId
3 – Install RDS PowerShell Module
Install a PowerShell module for WVD.
#Install RDS Module
Install-Module -Name Microsoft.RDInfra.RDPowerShell
4 – Create RDS Account
Create an RDS account to your Azure subscription.
#These commands are under the module that you just installed, you might need to import it
Import-Module -Name Microsoft.RDInfra.RDPowerShell
#First add a new RDS-account
Add-RdsAccount -DeploymentUrl "https://rdbroker.wvd.microsoft.com"
#Create new RDS-Tenant
New-RdsTenant -Name $myTenantName -AadTenantId $myDirectoryID -AzureSubscriptionId $mySubscriptionID
#Select the correct context for related commands
Set-RdsContext -TenantGroupName $myTenantGroupName
#Add RDS Owner role to our newly created Service Principal
New-RdsRoleAssignment -RoleDefinitionName "RDS Owner" -ApplicationId $svcPrincipal.AppId -TenantGroupName $myTenantGroupName -TenantName $myTenantName
#Add the Service Principal to your rds account
5 – Test that everything works with Service Principal
Test that everything works with a Service Principal. You should not see any errors.
#Test connection
$creds = New-Object System.Management.Automation.PSCredential($svcPrincipal.AppId, (ConvertTo-SecureString $svcPrincipalCreds.Value -AsPlainText -Force))
Add-RdsAccount -DeploymentUrl "//rdbroker.wvd.microsoft.com" -Credential $creds -ServicePrincipal -AadTenantId $aadContext.TenantId.Guid
6 – Prepare the host pool creation (optional)
Now you can create a host pool. You have to fill several values under the wizard of host pool creation. To help you I collected all of these from the same PowerShell session where you created the RDS tenant. Use next script to get out all the information. I will tell you which one to copy and where.
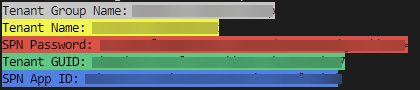
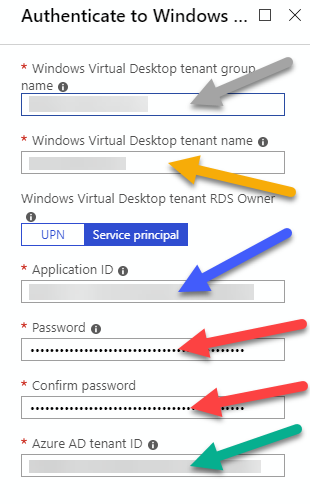
#Variable values
$spnpw = $svcPrincipalCreds.Value
$tenantGuidVerified = $aadContext.TenantId.Guid
$spnappid = $svcPrincipal.AppId

#Export information for host
Write-Host "Tenant Group Name: $myTenantGroupName" -ForegroundColor "Black" -BackgroundColor "White"
Write-Host "Tenant Name: $myTenantName" -ForegroundColor "Black" -BackgroundColor "Yellow"
Write-Host "SPN Password: $spnpw" -ForegroundColor "Black" -BackgroundColor "Red"
Write-Host "Tenant GUID: $tenantGuidVerified" -ForegroundColor "Black" -BackgroundColor "Green"
Write-Host "SPN App ID: $spnappid" -ForegroundColor "Black" -BackgroundColor "Blue"
Your output should look like this:
7 – Creation of host pool
Each user can belong to only one Application Group inside of the host pool. Application Group can only be for desktop sessions or for remote apps. So when looking from the end-user point of view in each host pool you can have only desktop or remote app type of published resources. However you can add several application groups (and host pools) for users. To create a host pool through the Azure Portal, open Marketplace and look for Windows Virtual Desktop – Provision a host pool.
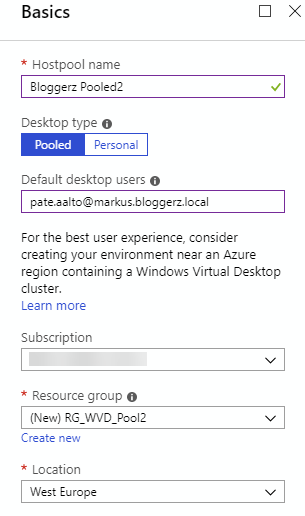
From the first page, add a name for your host pool, select desktop type – Pooled (shared with multiple users) or Personal (one desktop per user). Give also the name of user who is assigned for the pool. Currently WVD does not support groups, but it is still under preview, so let’s wait and configure it per-user 🙂 Select the Subscription that you want to use for the deployment and where you did create earlier the RDS Tenant. Create also new Resource Group for the host pool and select Azure Region that you want to use.
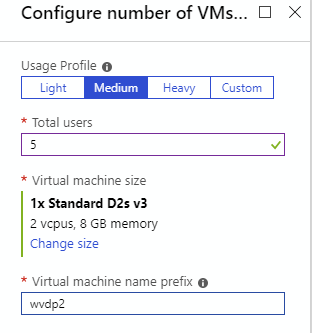
Select next your end user usage profile, specify total users to use, select VM size and add the prefix for virtual machines. If you add for example wvdp2 to prefix, VMs will be named like wvdp2-0, wvdp2-1 and so on.
To use gallery based image for your host pool operating systems select it for Image source. You can also select a disk type. Create an account to your domain that has domain join privileges and give the account information to the wizard. You can specify a specific OU if you want. Select also VNET and subnet for your session hosts.
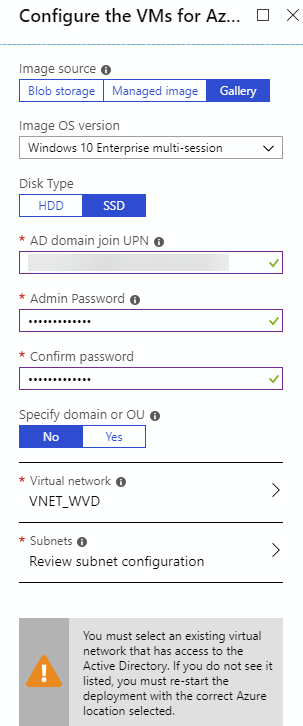
For the last page before summary, you have to fill information that you created in earlier steps with PowerShell. There were a color coded list of GUIDs ready if you used my scripts. Just copy paste the information from your PowerShell window to here with the help of color coding.
After this page, look the summary and let the provisioning begin. It takes at least 15 minutes with one VM.
8 – Test the Desktop connection
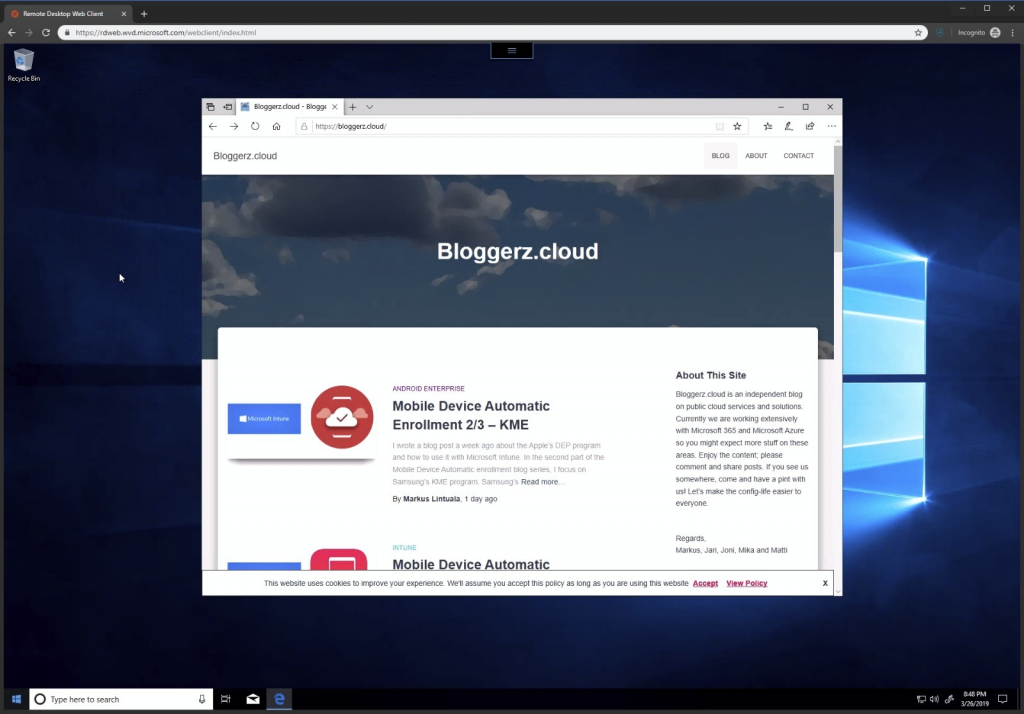
To test your desktop connection use browser (perhaps in incognito mode, if you have some account already integrated to the system) to WVD Web Client.
Sign in with the user that you provided during a host pool creation in step 7 and open the desktop. It just works!
9 – Create a Remote App application group
I suggest that you create now another host pool and new application group there. As mentioned earlier, user can belong only to one application group in one host pool at the time. With another host pool (and application group) you can publish desktops and applications for end-user same time.
After creating a new host pool, create a new Application Group with next PowerShell commands. Notice that we have a resource type called RemoteApp in this example. Let’s add also a few variables for later usage.
#Get variables
$myHostPoolName = "Bloggerz Pool 2"
$myNewAppGroupName = "Native Application Group"

#Create an app pool
New-RdsAppGroup -TenantName $myTenantName -HostPoolName $myHostPoolName -ResourceType "RemoteApp" -Name $myNewAppGroupName
10 – Adding applications for the application group
To add some applications to the group list first all your applications from the WVD Image.
#Get All Applications
Get-RdsStartMenuApp -TenantName $myTenantName -HostPoolName $myHostPoolName -AppGroupName $myNewAppGroupName | Select-Object FriendlyName,FilePath,IconPath,IconIndex | Format-Table
Select which one you like to publish and modify variables in the next PowerShell code and ensure that you get only one application to the application list now.
#Get only one Application
$newAppName = "Wordpad"
$newAppDescription = "You can write everything!"
Get-RdsStartMenuApp -TenantName $myTenantName -HostPoolName $myHostPoolName -AppGroupName $myNewAppGroupName | Select-Object FriendlyName,FilePath,IconPath,IconIndex | Where-Object { $_.FriendlyName -eq $newAppName } | Format-Table
Now you can create the application with next line of codes.
#Create Application Publishing
$newAppFilePath = (Get-RdsStartMenuApp -TenantName $myTenantName -HostPoolName $myHostPoolName -AppGroupName $myNewAppGroupName | Select-Object FriendlyName,FilePath,IconPath,IconIndex | Where-Object { $_.FriendlyName -eq $newAppName }).FilePath
$newAppIconPath = (Get-RdsStartMenuApp -TenantName $myTenantName -HostPoolName $myHostPoolName -AppGroupName $myNewAppGroupName | Select-Object FriendlyName,FilePath,IconPath,IconIndex | Where-Object { $_.FriendlyName -eq $newAppName }).IconPath
$newAppIconIndex = (Get-RdsStartMenuApp -TenantName $myTenantName -HostPoolName $myHostPoolName -AppGroupName $myNewAppGroupName | Select-Object FriendlyName,FilePath,IconPath,IconIndex | Where-Object { $_.FriendlyName -eq $newAppName }).IconIndex

New-RdsRemoteApp -TenantName $myTenantName -HostPoolName $myHostPoolName -AppGroupName $myNewAppGroupName -Name $newAppName -FilePath $newAppFilePath -IconPath $newAppIconPath -IconIndex $newAppIconIndex -Description $newAppDescription
Application is now added to your application group.
11 – Assignment of the application group
To assign an application group for an user, just add user to the group with the next PowerShell command (if it’s not already there).
#Add user permissions
Add-RdsAppGroupUser -TenantName $myTenantName -HostPoolName $myHostPoolName -AppGroupName $myNewAppGroupName -UserPrincipalName "pate.aalto@markus.bloggerz.cloud"
12 – Test of the application group
To test the application open again the Windows Virtual Desktop webclient and start the application from the list.
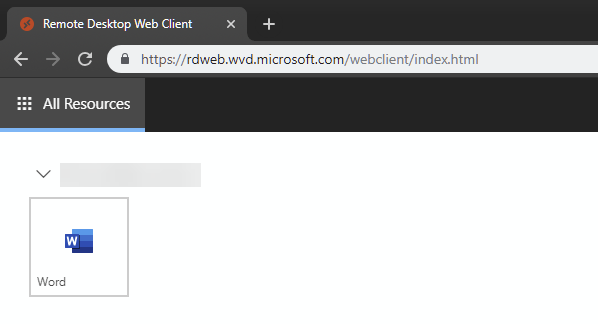
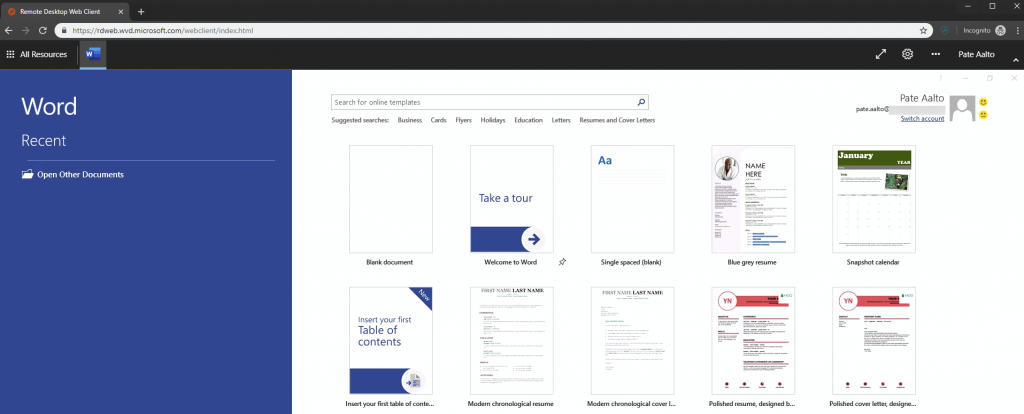
As you might notice, there is a Word application in the example that is not in the original image from the gallery. This might be the next post topic: how to customize WVD image 😉
Summary
At the end the Windows Virtual Desktop concept sounds really nice and the price point is much more lower than its competitors. While WVD is not planned for run GPU-stuff, you can use these in many different scenarios. You can get fully running secured and managed Windows 10 Enterprise Multi-Session to your phone, tablet or whatever and run your ERP desktop client from the field with your mobile or tablet.
There are much more features already in WVD like load balancing and container based roaming profiles. I will create a new post about those when I have time to test them better and have an understanding how those area working. In a meantime I encourage you to test WVD in your test environment. Remember that WVD is not in GA phase, it’s still under the public preview. I do not recommend yet to deploy this in production environment.

1 Comment
Anssi · 28.03.2019 at 12.10
Splendid! Next phase: Real life scenarios with SCCM and/or Intune assisted OS/Application deployments and customizations to avoid thick images.