What is Azure AD Privileged Identity Management?
I’m not going into the basics of PIM but you can read it from Microsoft Docs. I strongly recommend to spend the extra budget and effort and deploy PIM which requires Azure AD Premium P2 license.
In general PIM helps you to gain control over administrative roles and provide just-in-time access to your users and automatically expire the privileges.
The Case
I was recently doing a PIM deployment which included activating a lot of Azure AD roles for a huge amount of administrative accounts.
Environment had a lot of active Azure AD role assignments and it was unacceptable to manually click through the dozens of roles and assignments per user.
Considerations
Few notes from the field before you start deploying the role assignments.
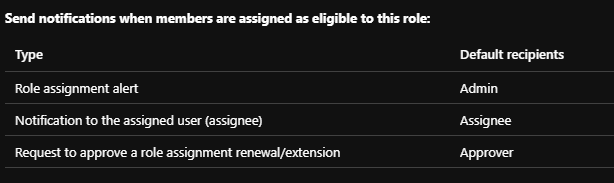
Notifications
By default your Global and Security administrators will receive e-mail notifications when you assign a role as eligible. You might want to adjust the role settings before doing bulk updates to avoid e-mail spam. These settings are found in PIM -> Manage -> Settings -> Choose the role.
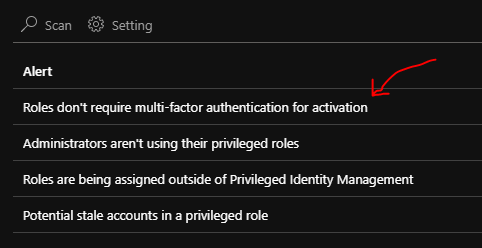
Multi-factor authentication
Another consideration is to require multi-factor authentication when activating the role. You can see the recommendation from alerts section and you can even automatically resolve them. These recommendations/alerts are found in PIM -> Manage -> Alerts -> Choose the alert to automatically resolve.
You can also bulk update the role settings using PowerShell, see the docs for more information.
Access Reviews
After you’re done with the assignments I recommend you to create Access Reviews for at least all the sensitive roles to keep the assignment up-to-date when admins come and go. Azure AD Access Reviews will significantly help you in regularly reviewing the role assignments.
PowerShell to the rescue
Fortunately there are PowerShell cmdlets available in Azure AD Preview module. I quickly played around with the cmdlets to get the hang of it and started to build a simple script to bulk update the role assignments.

Disclaimer! Use the scripts on your own responsibility and try to understand the logic before running them.
Note that in Azure AD PowerShell some roles are identified with a different name than the display name in the portal. For example “Exchange Administrator” is “Exchange Service Administrator“. See the full list here.
Change role assignment from active -> eligible or vice versa
The below script changes any role’s active assignment to eligible.
You need to be connected to your Azure AD account using ‘Connect-AzureAD‘ cmdlet and modify the variables suitable for your environment.
# Enter your Azure AD Tenant ID
$TenantID = "x-x-x-x"

# Enter the role name you are modifying
$RoleName = "Global Reader"

# Enter the assignment states before and after (from -> to)
$AssignmentStateBefore = "Active"
$AssignmentStateAfter = "Eligible"

# Enter the type of the action
$Type = "adminUpdate"

# Enter the justification message
$Reason = "Changing the role assignment from Active to Eligible."

# Set the schedule that's used later in the role assignment request - no end time means a permanent assignment
$schedule = New-Object Microsoft.Open.MSGraph.Model.AzureADMSPrivilegedSchedule
$schedule.Type = "Once"
$schedule.StartDateTime = "2019-07-31T09:00:00.000Z"

# Store the Role Id into a variable
$RoleID = Get-AzureADMSPrivilegedRoleDefinition -ProviderId "aadRoles" -ResourceId $TenantID -Filter "DisplayName eq '$($RoleName)'"
$RoleID = $RoleID.Id

# Store all the active assignments
$Roles = Get-AzureADMSPrivilegedRoleAssignment -ProviderId "aadRoles" -ResourceId $TenantID -Filter "roleDefinitionId eq '$($RoleID)' and assignmentState eq '$($AssignmentStateBefore)'"

# Change all the role's active assignments to eligible
foreach ($Role in $Roles) {
    Open-AzureADMSPrivilegedRoleAssignmentRequest `
        -ProviderId 'aadRoles' `
        -ResourceId $TenantID `
        -RoleDefinitionId $RoleID `
        -SubjectId $Role.SubjectId `
        -Type $Type `
        -AssignmentState $AssignmentStateAfter `
        -schedule $schedule `
        -reason $Reason
}
Add or update role assignment based on group membership
I also had a use case for adding dozens of users from a AD group to a Azure AD role assignment. Azure AD roles doesn’t yet directly support using groups but you can achieve this with PowerShell.
The below script will pull out users from a group and update their role assignment from active to eligible if it exists. All the other user’s role assignments will be untouched.
You need to be connected to your Azure AD account using ‘Connect-AzureAD‘ cmdlet and modify the variables suitable for your environment.
# Enter your Azure AD Tenant ID
$TenantID = "x-x-x-x"

# Enter the role name you are modifying
$RoleName = "Global Reader"

# Enter the Azure AD group for populating the members from
$Group = "ad_group_name"

# Enter the assignment state (Active/Eligible)
$AssignmentState = "Eligible"

# Enter the type of the action
$Type = "adminUpdate"

# Enter the justification message
$Reason = "Updating role assignments based on group membership."

# Set the schedule that's used later in the role assignment request - no end time means a permanent assignment
$schedule = New-Object Microsoft.Open.MSGraph.Model.AzureADMSPrivilegedSchedule
$schedule.Type = "Once"
$schedule.StartDateTime = "2019-07-31T08:00:00.000Z"

# Store the Role Id into a variable
$RoleID = Get-AzureADMSPrivilegedRoleDefinition -ProviderId "aadRoles" -ResourceId $TenantID -Filter "DisplayName eq '$($RoleName)'"
$RoleID = $RoleID.Id

# Populate all the users from the group
$Groups = Get-AzureADGroup -Filter "DisplayName eq '$($Group)'"
$Groups = $Groups.ObjectId
$Users = foreach ($Group in $Groups) {
    Get-AzureADGroupMember -ObjectId $Group
}

# Add all the users to either active or eligible role assignment based on your selection earlier
foreach ($User in $Users) {
    Open-AzureADMSPrivilegedRoleAssignmentRequest `
        -ProviderId 'aadRoles' `
        -ResourceId $TenantID `
        -RoleDefinitionId $RoleID `
        -SubjectId $User.ObjectID `
        -Type $Type `
        -AssignmentState $AssignmentState `
        -schedule $schedule `
        -reason $Reason
}
I hope this can save you some time when deploying PIM and assigning the desired roles for your admins.

4 Comments
Raf · 09.02.2021 at 16.05
HI, thanks for the interesting blog!
quick question: do you know if it is possible to configure/update the notifications for each role, using PowerShell (or Graph API?) … still seems to be missing?
Joni Nieminen · 10.02.2021 at 09.50
Thank you! According to https://docs.microsoft.com/en-us/azure/active-directory/privileged-identity-management/powershell-for-azure-ad-roles#retrieving-and-updating-role-settings you can’t achieve this programmatically.
There’s a similar feedback to this matter here https://feedback.azure.com/forums/169401-azure-active-directory/suggestions/39741763-pim-configure-default-settings-for-all-role-assi.
I can’t find the additional e-mails/notifications property from the Graph API namespace either https://docs.microsoft.com/en-us/graph/api/resources/privilegedrolesettings?view=graph-rest-beta
John · 09.06.2021 at 22.36
Hi Joni, great script for changing AAD role assignment type. Have a question to ask you: do you know if it is possible to move the scope already set in the original Active assignment state to the new Eligible assignment state? For instance: I have Role1 with a user member who has Active assignment with AppReg1 scope. Then I want to change that assignment from Active to Eligible. Running your script it creates the new Eligible assignment with Directory scope. I need to narrow the scope, keeping the ones defined in each of the Active assignments. Thanks!
Joni Nieminen · 13.06.2021 at 09.26
Hey John,
You can restrict the scope in “New-AzureADMSRoleAssignment” cmdlet using the -ResourceScope parameter. See here for an example!